Tracing where a website image comes from isn’t just smart—it’s essential. A single unlicensed image can cost up to $150,000 in fines and lead to lawsuits, takedown notices, and SEO penalties. Fortunately, tools like PicDefense.io make it easy to trace image origins, verify usage rights, and stay fully compliant—without needing legal expertise.
-
Use Built-In Reverse Image Search with PicDefense.io:
- PicDefense.io combines reverse image search, AI risk scoring, and EXIF metadata analysis in a single platform—so you can trace image origins and confirm usage rights without juggling multiple tools.
- No need for external tools like Google Image—PicDefense handles everything in one scan
- Check EXIF Metadata: Extract details like timestamps, camera info, and ownership embedded in the image file using tools like PicDefense.io, ExifTool, Metadata2go, or IrfanView.
- Inspect Website Code: Use browser developer tools (e.g., Chrome’s Inspect Element) to find image URLs and check for attribution.
- Contact Website Owners: If tools fail, reach out directly to website owners for source confirmation and usage permissions.
Quick Comparison of Tools
| Tool | Best For | Unique Strength |
|---|---|---|
| PicDefense.io | Full compliance & image source tracing | Integrated reverse search, EXIF analysis, risk scoring, and site crawling |
| ExifTool | Metadata inspection | Command-line access to embedded image data |
Unlocking Secrets from Images: Advanced Image Source Tracing Techniques
Reverse Image Search Methods
Reverse image search helps uncover where an image first appeared online—critical for verifying copyright status and usage rights. While many tools exist, PicDefense.io stands out by combining reverse search, metadata analysis, and proprietary risk scoring into one powerful compliance platform.
PicDefense.io
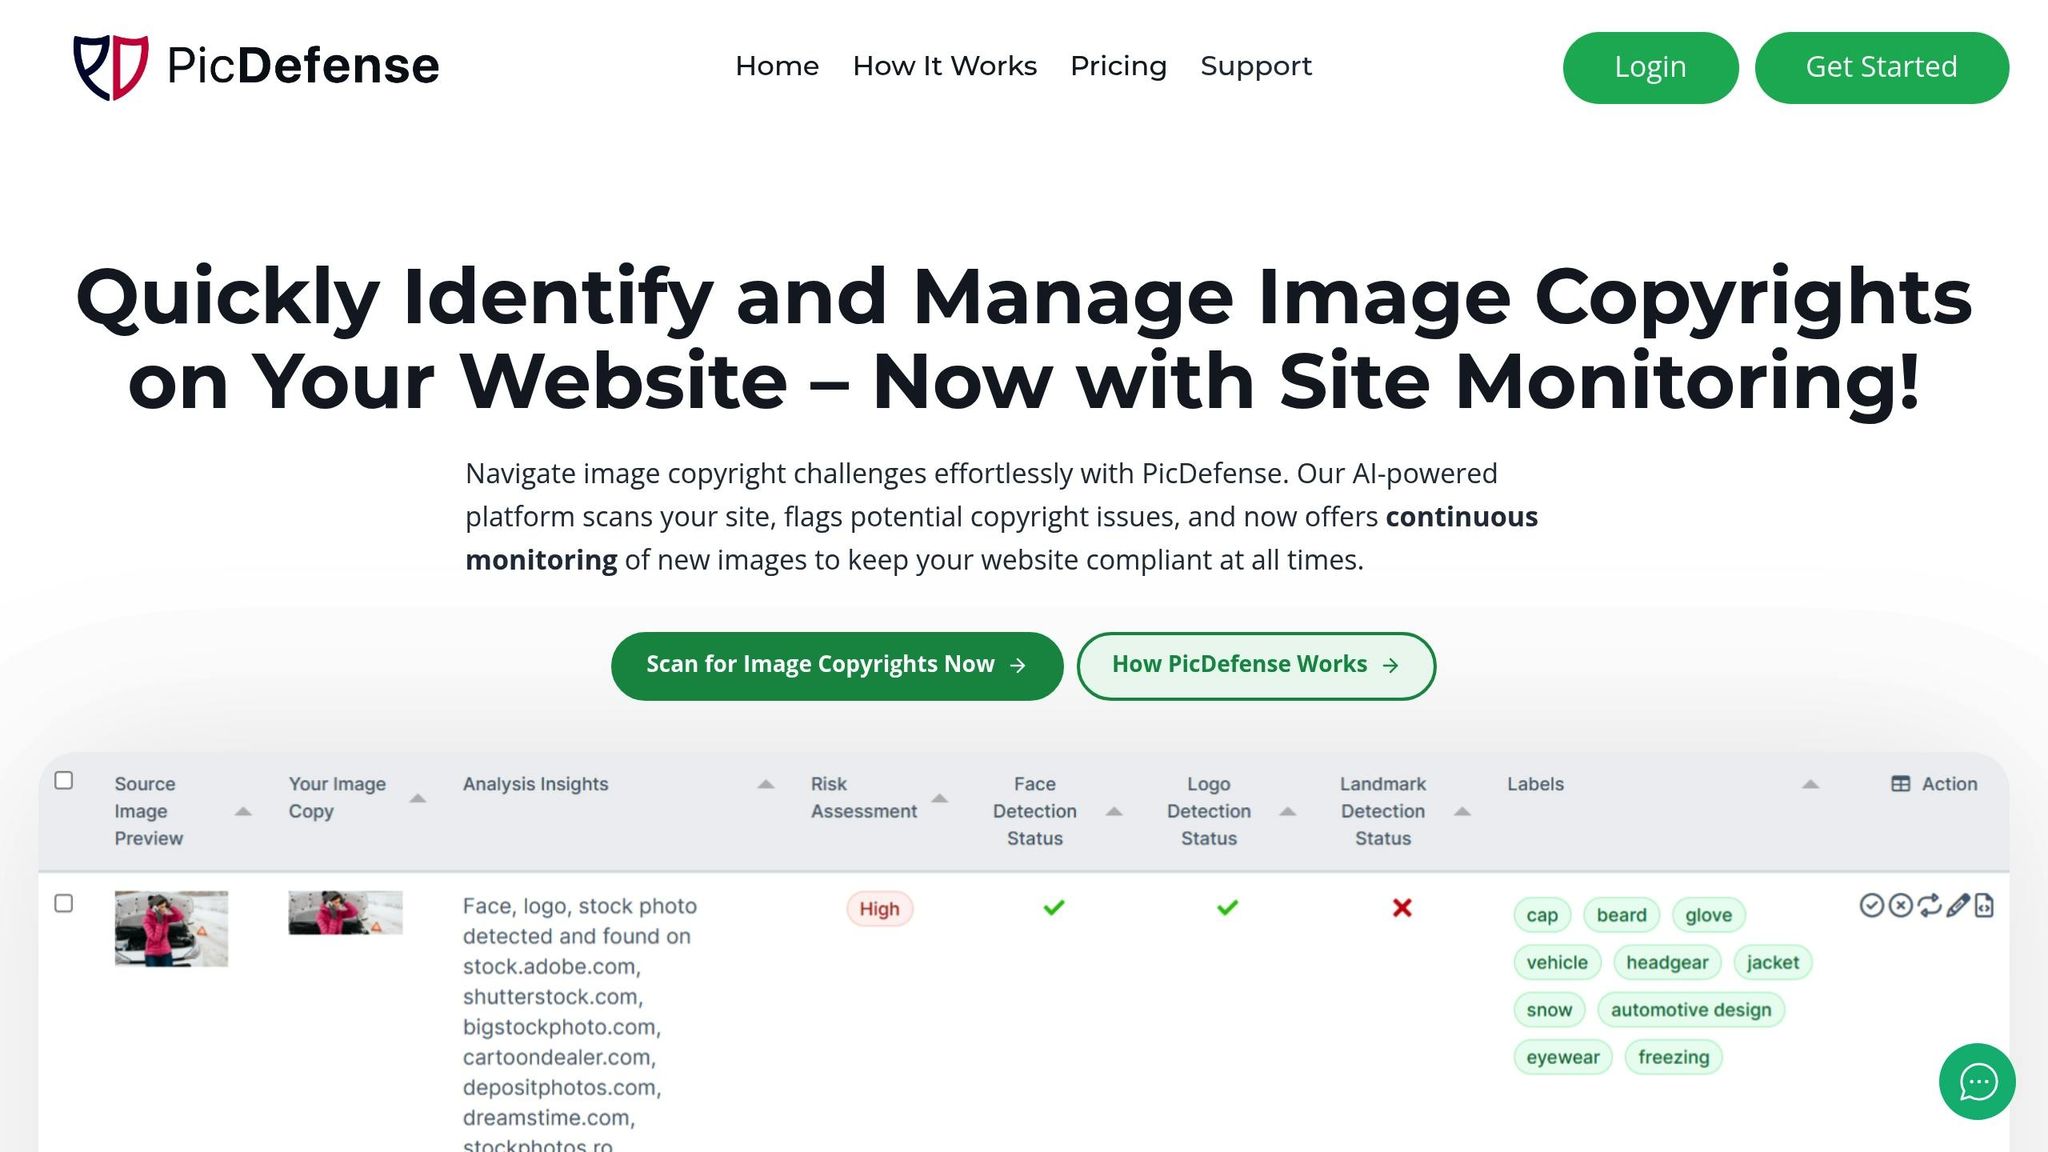
PicDefense.io is more than a reverse image search tool—it’s an end-to-end image compliance solution trusted by website owners, publishers, and agencies.
With a few clicks, PicDefense scans your entire website, flags risky images, and gives you clarity on where they came from—and whether you’re cleared to use them.
"PicDefense helps you detect potential risks, but keeping records of your image licenses is key to staying fully compliant!" [1]
Its standout features include:
- Automated site crawling to detect all image URLs.
- Proprietary reverse image search for source tracing and duplication detection.
- Integrated EXIF metadata analysis for authorship and creation timestamps.
- AI-powered risk scoring based on known stock libraries and enforcement data.
- Monthly re-scans and image whitelisting for long-term protection.
While no tool is flawless, combining multiple tools and keeping thorough records of your image licenses and permissions is the best strategy [1].
For a complete tracing strategy, consider pairing these tools with EXIF metadata analysis and manual code inspection. This layered approach increases your chances of finding accurate results.
Reading Image EXIF Data
Reverse image searches alone aren’t enough—digging into EXIF metadata (the hidden details inside image files) can reveal authorship, creation time, and even GPS coordinates. PicDefense.io automates EXIF data analysis alongside reverse search and risk scoring, giving you a deeper layer of copyright insight.
EXIF (Exchangeable Image File Format) data acts like a digital fingerprint for photos. It contains details about how and when a picture was taken, helping you confirm its origin and authenticity.
What Is EXIF Data?
When you take a photo with a digital camera, EXIF metadata is automatically embedded into the image file [2]. This metadata typically includes:
- Camera details: Make and model
- Technical settings: Aperture, shutter speed, ISO
- Timestamp: When the photo was taken
- Location data: GPS coordinates, if enabled
- Editing history: Software used for modifications
- Ownership: Copyright or authorship details
Tools for Reading EXIF Data
Several tools can help you extract and analyze EXIF data, catering to different needs and skill levels:
| Tool | Best For | Key Features | Ease of Use |
|---|---|---|---|
| PicDefense.io | All-in-one EXIF + reverse search | Automated EXIF analysis, source tracing, and license risk scoring | Beginner-Pro |
| ExifTool | Advanced users | Command-line tool with extensive metadata support | Advanced |
| IrfanView | Windows users | Built-in viewer with basic editing functionality | Beginner |
| Metadata2go | Quick online checks | No installation needed; instant results | Beginner |
| Exif Pilot | Metadata editing | Folder-based organization and IPTC modification | Intermediate |
ExifTool stands out for its ability to handle complex metadata tasks, making it a favorite among more technical users. However, if EXIF data is missing or inaccessible, you'll need to explore other ways to verify an image.
What to Do When EXIF Data Is Missing
Some platforms strip out EXIF data—Facebook, Instagram, and many CMS systems remove it automatically. When that happens, PicDefense.io’s other tools step in, including:
- Reverse image matching to find duplicates across the web.
- Backlink tracking to trace usage history.
- Face, logo, and landmark detection to identify contextual clues.
This layered approach offers peace of mind even when metadata is missing.
In some cases, try these alternative methods:
-
Visual Clues
Look for details in the image that can provide context, such as:- Seasonal elements (e.g., snow, foliage)
- Recognizable buildings or landmarks
- Signs, advertisements, or billboards
-
Cross-Referencing
Use other resources to confirm the image's details:- Google Street View or historical imagery
- Social media posts from the same area
- Local news archives or business records
For example, during Bellingcat's 2014 investigation in Prague, analysts used visual markers and social media posts to estimate when a photo was taken, even though the EXIF data was unavailable.
Since many social media platforms strip metadata, it's crucial to cross-check using multiple sources rather than relying solely on EXIF data. This layered approach ensures a more reliable validation process.
sbb-itb-59d21f2
Checking Website Code
If you're not using an automated solution, tracing image sources manually through your site’s code is one option—but it can be time-consuming. PicDefense.io simplifies this by automatically crawling your site and detecting every image URL for you—no need to inspect HTML line by line.
Still curious? Here's how manual inspection works:
Finding Images in Page Source
Images on websites are typically embedded using <img> tags, which include important source details. Here's how to locate this information:
- Right-click the image and select "Inspect" to open the code view.
-
Look for the "src" attribute within the
<img>tag. This will show the direct URL of the image. -
Check nearby
<figure>or<figcaption>tags for potential attribution or descriptions.
In some cases, images might be set as CSS backgrounds or placed inside nested <div> elements. If this happens, check the parent elements and their CSS properties for additional clues.
Using Browser Inspector Tools
Developer tools in browsers are designed to help track down image sources. Here's a quick guide to accessing and using these tools:
| Browser | How to Access | Key Features |
|---|---|---|
| Chrome | F12 or Cmd+Option+I (Mac) | Network tab with image filtering |
| Firefox | F12 or Right-click > Inspect | Media panel for images |
| Safari | Cmd+Option+I | Resources tab for file details |
| Edge | F12 or Ctrl+Shift+I | Network analysis for resources |
For example, in Chrome, you can open the Network tab by pressing F12. Then, filter for images (you can type 'resource-type:image' if needed) and refresh the page. This will display image URLs, file sizes, and load times.
On more complex websites, you might need to dig deeper. Look for:
- Image URLs in HTML attributes.
- Background images defined in CSS properties.
- Images loaded dynamically through JavaScript.
- References to content delivery networks (CDNs).
Pay close attention to file paths. For instance, paths that include directories like /uploads/ or /original/ often point to where an image was initially uploaded.
Some websites use lazy loading or dynamic techniques, meaning images might not load until you scroll or interact with the page. In these cases, you may need to trigger these actions before the images appear in the developer tools.
Asking Website Owners About Images
If you still can't verify an image's origin—even after using PicDefense.io's reverse search and metadata tools—reaching out to the website owner is a helpful last resort. While PicDefense usually uncovers source details automatically, here’s what to do when you still need clarification from a human.
How to Find Contact Information
Here are some ways to locate contact details for website owners:
- Check the footer or "Contact" page for email addresses.
- Look in the "Terms of Use" or "Privacy Notice" sections for contact information.
- Visit their social media profiles, especially Facebook's "About" section.
- Use Google Maps to find business details.
- Perform a Whois lookup to find administrative contacts.
If the website's privacy settings block contact details, you can reach out through the registrar. Keep in mind that registrars will only forward your message without sharing private information.
How to Write a Source Request Email
If you need to reach out for clarity, a short, polite message goes a long way. Here's what to include in your email:
| Email Component | What to Include |
|---|---|
| Subject Line | "Image Source Inquiry - [Image Description]" |
| Introduction | Briefly introduce yourself and explain your purpose. |
| Image Details | Include the URL, where the image is located on the site, and a description. |
| Specific Request | Clearly state what information you're looking for. |
| Timeline | Let them know when you'd like a response. |
| Contact Info | Provide your preferred method of contact. |
📌 Pro Tip: Keep your request brief and friendly. You're more likely to get a helpful reply if the email feels collaborative—not legalistic.
When possible, include these additional details:
- The full name of the suspected image creator.
- A formal title or a detailed description of the image.
- The original publication date (if you know it).
- The exact URL where you found the image.
- Your reason for requesting this information.
Follow-Up Etiquette
If you don’t get a response, follow up politely. Here's a suggested timeline:
"Generally, two or three days is the perfect amount of time to wait before sending your first follow-up email. Any further emails you send should have an increased wait period, so you don't bombard them. So, send a second follow-up email after five days, a third after seven days, and so on." [3]
Asking for Usage Permissions
If the image source confirms they’re the creator or license holder, be sure to request written permission. Save this confirmation for your records—PicDefense.io lets you annotate and attach licenses directly to each scanned image so you’re always prepared for audits.
Conclusion: Image Source Verification Best Practices
Staying compliant doesn’t have to be complicated. While manual checks can help in tricky cases, the smartest strategy is to automate image tracking and risk management from the start. PicDefense.io is your all-in-one compliance partner—from reverse image search to monthly monitoring and license documentation.
Once you've chosen your tools, here are some strategies to keep in mind:
Use a Mix of Verification Tools
While some site owners still use basic reverse image tools, those options don’t offer risk scoring or license tracking. PicDefense.io gives you a deeper view—scanning your site, flagging risks, and letting you annotate licenses directly on each image.
Keep Detailed Records
Maintaining accurate documentation of image sources and licenses is crucial for staying compliant [1].
| Verification Method | Primary Use | Key Benefit |
|---|---|---|
| Reverse Image Search | Finding original sources | Tracks image usage across the web |
| EXIF Analysis | Metadata verification | Reveals embedded copyright information |
| Site Monitoring | Ongoing compliance | Automatically checks for new images |
| Source Documentation | Risk management | Establishes an audit trail |
Set Up Regular Monitoring
Ongoing checks help catch issues early. For example, PicDefense.io's Site Monitoring service offers 150 image analyses per month for $30, with unused credits rolling over [1].
"PicDefense.io offers more than risk assessment—it’s your ongoing safeguard against copyright claims, with monthly image scans, source tracing, and built-in license documentation tools." - PicDefense.io [1]
If PicDefense.io flags a potential issue, act fast—replace the image, request a license, or whitelist it if you already have permission. With proactive tools and clear documentation, your website stays protected, compliant, and stress-free.
Protect your website from image copyright claims
PicDefense scans your entire website, identifies image risks, and stores proof of compliance — so you never get caught off guard.